Jul 20,2017 15:32 pm / Posted by Brian Fisher to Convert Video
Importing M4V files to iMovie and successfully importing the files are two different things. You can import files but the whole process will not be successful. That is one misconception that you must deal with when looking for the best way about importing M4V to iMovie for editing. Don't sit down and make assumptions that your M4V files have been imported when the process has actually stalled. You need to follow each and every step keenly until you are sure it has successfully completed.
- Part 1. Convert M4V to iMovie Compatible Format
- Part 2. Import M4V Files to iMovie and Possible Issues
Part 1. Best Solution to Convert M4V to iMovie Compatible Format
UniConverter is one of the effective options for converting M4V files to a format that is well compatible with iMovie. You can consider the many formats for standard videos, high definition videos and online videos that UniConverter supports before choosing what to settle for. The format list is endless which points out to how compatible this software program is when it comes to importing M4V files to iMovie for editing. There are also many audio formats that iSkysoft video converter for Mac works with very well.
UniConverter - Video Converter
Get the Best M4V to iMovie Video Converter:
- Convert M4V to iMovie compatible format with only three simple clicks.
- Convert M4V to 150+ video and audio formats at 90X faster speed.
- Download online videos from YouTube, Vimeo, Vevo, and 1,000+ video sites.
- Burn M4V videos to DVD or copy DVD to various disks as backup.
- Edit your M4V files before converting via Trim, Crop, Rotate, Effects, etc.
- Transfer converted or downloaded video to mobile devices with USB easily.
Tutorial to Convert M4V files to iMovie
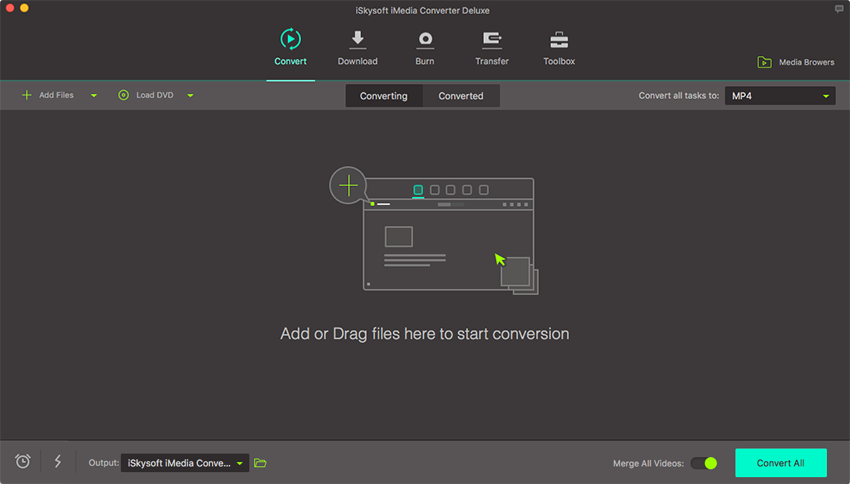
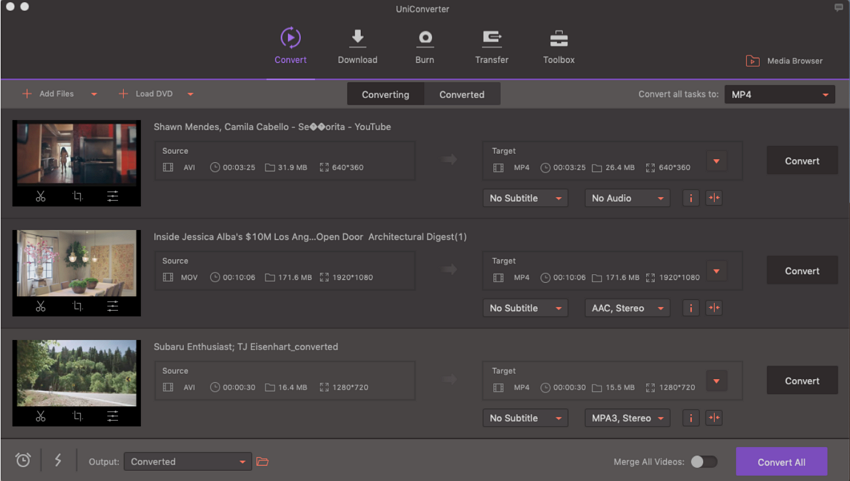
Step 1. Importing M4V files to the iMovie converter
To start with, you should import your M4V videos to the M4V to iMovie Converter program with drag and drop method. Alternatively, you can achieve that by clicking "Add Files" to locate M4V files in your Mac or Windows.
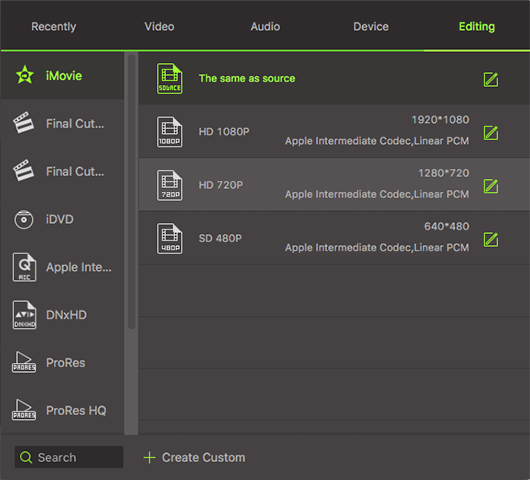
Step 2. Set iMovie output format
In this step, you should go to the format tray and enter the "Editing" option. Then set "iMovie" as the output format. After that, this software will help convert M4V to iMovie supported format without any more settings. Windows users could directly head to "Video" tab and select MOV format. All the formats support selection of resolution, or change for encode settings like encoder, frame rate, bit rate, etc. Modify according to your need.
Step 3. Start to Convert M4V to iMovie
Last, click the "Convert" or "Convert All" button at bottom right to start M4V to iMovie conversion. This process will be finished within a few minutes, it depends on the length of your video clip.
Optional: Online Tool to Convert M4V Videos to iMovie
If you don't want to install a computer program, you can also try online video converter to convert your M4V Videos to iMovie compatible formats. Try it below:
Note: Because the online tool doesn't support "https", so if the content below was blank, please manually click the "Shield" icon on the right of your browser address bar to load the script. This action is secure without any harm to your data or computer.
How to Import Converted M4V Files to iMovie?
Importing M4V files to iMovie is a procedural mission just like any other. You have to follow the outlined guidelines in making sure everything goes as planned and succeeds without fail. Even as you go through this user guideline, it is important to point out that iMovie only imports video files that it will be able to do editing. Therefore, make sure your M4V files are in a situation of being edited without causing many problems.
Step 1: Launching your iMovie program will be the initial step to allow you create a new project on the timeline. The files have to be easily viewed on the timeline because that is where all the editing takes place.
Step 2: Set the project theme, the name of the project, put in the aspects ratio as well as the frame rate. All these have to be attended to before proceeding. Once the clips have been imported to the iMovie, they will be stored in the Events Library but first things first.
Step 3: From the iMovie, you will be able to see the import window which has some key elements for your understanding. The upper part has a preview window and all selected clips will be showing under that window. Below that, you will see the play controls which consist of pause, play, stop and forward buttons. When through with importing the footage from your camera, click the "Done" button on the right side of the iMovie window after which it will close down. There is a sheet that will come up immediately with two options; add your imported video to an existing event or create a fresh event. You should be wise enough to determine which among the two options will play to your advantage.
Common Problems When Importing M4V Files to iMovie
# Problem 1. The process of importing M4V files to iMovie is not always flawless because you can experience a few hitches now and then. One of the biggest problems comes when importing footage from a camera as it is always unclear.
When the camera is plugged to the computer and you click on "import" in iMovie, it will show that everything has gone fine and you can see the imported footage on iMovie. However, disaster comes in when the camera is unplugged as the imported footage disappears. You will get an error notification reading "missing camera" from which point you will stop viewing the imported footage.
# Problem 2. The second problem that you are most likely to encounter when using iMovie to import M4V files is inactive functions and features.
For one, the drag-and-drop feature as well as import button will fail at the hour of need and when you need their services most. These are the only options you have in iMovie for importing files and if they fail you can't proceed. Their breakdown can be occasioned by overworking once you have given it too many commands at a go. To ensure such features and functions are not interrupted, you must give the program sizeable commands it can handle at a go but not too much that can even make it to function in a slowed manner.
# Problem 3. Many users of iMovie have been unable to play their videos after importing and that is simply an issue to do with incompatibility.
It can be traced all the way to the type of file format used and it will most certainly be incompatible to the iMovie. The only solution at such a point is converting the file to a compatible format which in this case is M4V. There are many convertors in the market that you can consider so don't cry about shortage of options. Incompatibility problems are very common and widespread when importing M4V files to iMovie for editing thus this point should be treated with lots of seriousness.